Zoe’s beauty blogs from 2006 – now

21
Jan

The glorious sorcery of POST-makeup line fillers and complexion perfecters.

As we age, many of us womanly folk have the same desire: to fill in fine lines, blur out imperfections, and just make our complexion look fresh, even in texture, youthful and healthy.

Some of us rely on skin care and makeup and facials to do this, others prefer needles and lasers and others still choose to mash up asparagus and wear it as face paint, which is odd, but I would never judge.

What you may not know, is that there exist some tricky little products (and applications thereof) out there, and after giving them a wallop, and seeing your lines magically kind of blur away, you may even like to add them to your arsenal. Some can even – and I say this with no word of a bullshit – effectively mimic the smoothness of Botox. Just for a few hours, but still.

These soft-focus effect products work to fill in and effectively “remove” lines, blur the skin’s texture, and smooth the face – all jobs job generally reserved for pre-foundation products like primer, or foundations with light-diffusing ingredients. (They’ll sometimes also generally mattify and make pores look smaller, although that’s not their key job. Use a dedicated product, like Benefit’s Porefessional, for that.)

Optical diffusers and skin smoothers aren’t new, but recent variations tend to be lighter and less ‘siliconey’ feeling than they were five years ago, which is a good thing, especially for those who don’t like the feel of too much gear on their face, and who like to do little touch ups on their lines during the day. (I generally need a line-plump up by late afternoon, once the air con and coffee has stolen all my moisture.)

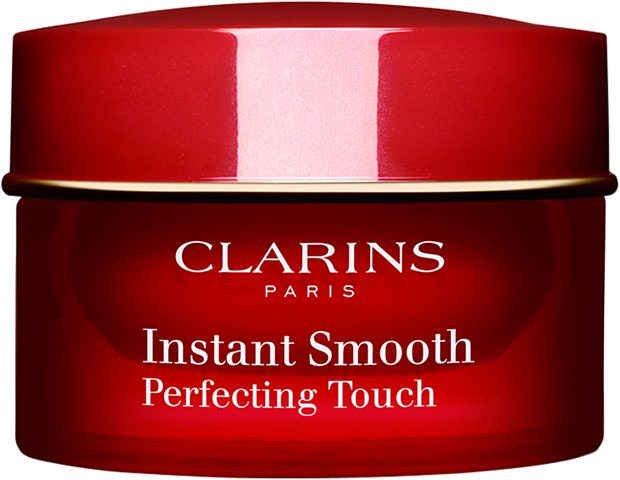
The original, and definitely one of the best is Clarins Instant Smooth Perfecting Touch. It comes in a wee pot, and will last you about six months at least, because you should only be using amounts suited to pixies or elves. Dab – DON’T RUB – this velvety little ‘balm’ directly onto your lines underneath your foundation, wait a few minutes, then apply (ideally paint using a foundation brush) your foundation on. Alternatively, you can dab some lightly onto those same areas after you’ve applied your (liquid) foundation.

Clarins Instant Smooth

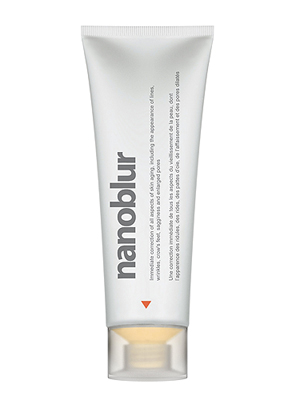
One that I wrote on last year and which has sold it’s little orange box off, is Nanoblur. It’s not quite the miracle they tout it to be, other products give similar results with far less confision, and Nanoblur could definitely improve their instructions because as any quick search will expose, most reviews of it end in the poor lass trialling it quitting due to the product balling on their skin, or their foundation looking like a three-year old applied it. But I’ve had some luck with it. The key is to remember you apply it AFTER foundation, you NEVER rub it in, and it is NOT PRIMER. There are loads of wonderful primers out there, but this isn’t one of them. Also, don’t get tricky and add it to your foundation – horrible idea. I did that. Yuk.

It works magnificently when I wear no make at all, or just tinted moisturiser, (apply your moisturiser before Nanoblur) but generally speaking, I use it with liquid foundation, and like this: I apply a moisturising physical sunscreen (such as Aspect Hydra Shield) and let it fully sink in. Then I apply my CC cream or liquid foundation, with my fingers or Beauty Blender, patting it on gently, letting it fully sink in. Finally, I very gently and lightly (so as to avoid slipping and balling) pat Nanoblur onto the areas I want to soften. I do not rub it in. Ever.

Nanoblur

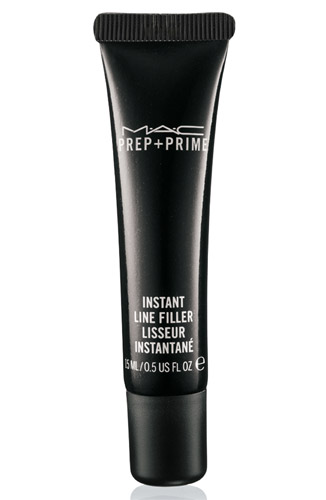
There is also MAC’s Prep + Prime Line Filler, which will please those who felt their original Prep + Prime product wasn’t perhaps gutsy enough. Just like the fellas above, it works to camouflage and soften lines, but having some primer qualities as well as a filling ones, (yelly note: this is NOT A PRIMER, it’s for spot line softening only, the small tube gives a hint as to how much you should be using) it offers more when it comes to keeping makeup in place, for longer, and in a more flawless fashion, on/around/under the Prep + Prime Line Filler.

I have dry, not oily or pore-visible skin, so I can’t tell you how it works on those issues, but what I can tell you is that I’m a Leo and prefer lattes over cappuccinos. Also I can tell you, of slightly more relevance, that this tiny tube’s contents does great things for filling out my smile lines (it’s been a fun life) and forehead crinkles (but also a deeply thoughtful one.)

MAC-Prep-+-Prime-Instant-Line-Filler


The bottom line:

– These are not primers. They are basically velvety little spac fillers.
– Dab onto your face, do not rub.
– Generally they are to be applied AFTER your foundation, (exception: Clarins Instant Smooth works underneath makeup beautifully) and just onto the precise areas you want to soften/blur/look like your 10-yr old self.
– They’re great for touch-ups during the day, or a freshen up after work/before your hot date at Hog’s Breath Cafe.
– Do not spread onto Cruskits and eat as a snack.

The REAL bottom line:

Thank you all so, so much for your enthusiasm and excitement regarding my forthcoming skin care line. You blew my socks off, and that’s saying something because I was wearing thigh-high lace-up boots.


Responses to this drivel: 16 Comments
14
Jan

I’m launching my own skin care line.

I am!

I really, really am. And HOLY SHIT IT’S EXCITING. I am so thrilled to even be writing this (admittedly cryptic and annoying) post about it, such has the level of secrecy been thus far.

I’ve been working on the range since 2012, and I can say with absolute certainty that it is the finest skin care in the entire world, which might sound like an arrogant, unqualified and completely outrageous claim, but that’s only because it is an arrogant, unqualified and completely outrageous claim.

Still, it’s very, very lovely, and I am almost certain you will like it, because, well I kind of created it with you in mind.

You being all of the gorgeous, enthusiastic, curious, feedbacky fruits I’ve had the pleasure of writing for and interacting with since I became a beauty editor a decade ago. You’ve been so beautifully honest about what you like, what you don’t like, what you use, what you think you should be using, what you know you should be using, and most vitally, just how confusing you find skin care to be.

And I agree. It IS confusing. There are so many dingin’ products out there, and so many different steps, and so many avenues and options to pursue, and so many big sciencey words and terrifying potential skin issues, it’s no wonder so many of us:

– just stick to whatever we’ve always used in the hope it’s doing something/anything

– buy whatever is new and shiny and popular because the ads make it sound so rad

– copy whatever our mum/sister/friends use

– resort to rubbing peanut butter on our faces before bed.

And look, I’m the first in line to try products with dazzling claims and fancy new ingredients. That’s my job. BUT, ultimately, and I say this as someone who can literally choose to use any skin care product she desires, and has given very many of them a good whack over the years, (and will continue to) simplicity is the backbone of my skin care routine. (Also, I travel a lot and have got my basics down to a fine art.)

All I really use is:

A great cleanser.

Something with AHAs to exfoliate.

Moisturiser.

Lip balm.

A physical sunscreen.

Targeted serums.

Stuff to keep the skin on my body nice.

And so I wondered…. would it be the craziest thing in the world to make a tight edit of really very useful, incredibly simple, extremely natural but very effective skin care products that combined my years of experience testing and using a wide range of them, with the ingredients I know work, with my desire for simplicity and my firsthand understanding of what women actually want (and need, whether they know it or not) from their skin care? And – gasp – make it all a bit fun, too?

No. It would not be the craziest thing in the world. (That would be smoking on a commercial airliner while announcing loudly that you are messenger from out of space here to expertly cull the population using planes as your weapon and caramel sauce as your sustenance.)

That said, it has been a BIG BIG undertaking. I now get why not many people start their own skin care lines. It’s hard. Stressful. Challenging. And even though I have an exceptional team around me, including overwhelmingly valuable guidance from my dear friend, Megan Larsen, founder of  superb organic skin care brand (and personal favourite) Sodashi, it’s been a huge, wild learning curve, one not helped by my insane levels of fussiness and perfectionism and endless demands of my brilliant biochemist for ‘less ingredient X’ and ‘half of a whisper more of ingredient Y,’ and questions regarding making something ‘less grabby but not too slippy, you know?’

Zoe Foster Blake Skin Care Samples
Some of my many many samples…

Here’s an example: This is VERSION 16 of my lip balm. And that’s not even the final one. No surprises there, though, you guys know how fucking pedantic I am about lip balm. Always have been. Never quite found the perfect one. So, if I am making my own, guess where all of that pedantic fury is going to be funnelled?

Zoe Foster Blake Skin Care Versions 2
Version 16. The almost final product. 

To say that I am impressed with this particular product is a violent and spectacular understatement. I don’t want to talk it up too much, but actually, wait a second, yes I do. It’s excellent. It is! Am I allowed to say that? Who cares. As you can imagine, it’s stupidly exciting finally getting the products to look, feel, smell and act just as I imagined them to, and use them and love them, and just be disgustingly proud of them like a gross stage mum. 

You cannot know how excited I am for you all to try them.

Speaking of which, this post is obviously just a frustrating teaser, but the range will officially launch April 1. (Yes, on April fools day. You know me).

Well before then, though, I will of course give you all the proper details about the range like, oh I don’t know, the name maybe? And the product breakdown, what they do, the long list of nasties we left out, the cool shit we definitely didn’t leave out, what they look like, smell like, where they like to eat lunch, where they were made, and where you can buy them.

AND! Hold on to your hand creams, because in February I am doing a special pre-order campaign just for my faithful fruits. Of course I am! You helped create the range, it’s only fair you get your silky paws on it first.

Yours in giddiness and perfectly nourished lips,

Zo


Responses to this drivel: 174 Comments
27
Dec

My top beauty products for 2013

Never an easy thing to do, choose your favourite beauty children. But if I had to choose, because there was a large hired goon two feet away from me, tapping menacingly on his small Sephora shopping basket with his eyebrows raised, then these would be my favourite beauty products of 2013. Aside of all the ones I have forgotten, obviously. Of which there are probably many. Apologies.

REVLON NEARLY NAKED MAKEUP $25.95

Been meaning to post on this since I was a little boy. So underrated. So cheap! Lightweight, sheer but with great buildable coverage, dewy, lasts nicely and very quickly able to make your skin look frrrresh, THIS is the foundation for any fruits needing something that covers all bases, as it were. Lovely silky feeling, too.

Revlon-Nearly-Naked

 NIVEA IN-SHOWER BODY MOISTURISER, $8

We all take beauty shortcuts if we can. Oh come on! I’ve seen you wearing lipstick as blush, and use nail polish as shampoo… So, obviously if we could blend the body wash bit of the day/night with the body lotion bit, why the dang wouldn’t we? It’s not the first product like this to waddle onto the market, but it sure is a good one. (Of course, being on a vehement anti-stretch mark bender right now, I add more oil/butter on the stretchmarky bits.)

BENEFIT FAKEUP $38.50

Have we not always dreamed of an undereye concealer that was genuinely hydrating, and didn’t, not even for a nanosecond, cause fine lines to be accentuated, or crepeyness, or just that shit, dry, old look that so many concealers unfortunately create, but rather create a luscious glow of hydrated, fresh, plump evenness? OF COURSE WE HAVE, YOU GORGEOUS DUNCE. And Benefit bloody went ahead and did it, din’t they, by popping the concealer in the middle of a lovely, creamy hydrating shell of balm-like moisturiser. I love this gently swiped or dabbed along under my eyes (after foundation or just BB cream) and then blended and pushed in with warm middle fingers for bright, concealed, fresh eyes. (I use the medium… concealer should be same tone as your skin, not lighter.)

Benefit_Fake_Up

O&M MINERAL LIQUID CCT AT HOME COLOUR

O&M colour is hugely popular with those who prefer their hair colour ammonia-free, and this (in-salon) version is a cracker. I tried it in NYC earlier in the year when the O&M creative director/superstar Janelle Chaplin (also a good friend and valuable team member) and decided to freshen up my natural brown one arvo. I LOVED the gloss and shine and health my hairs (well there’s more than one) were given. An especially good low-commitment option if you’re between colours or despise regrowth.

BIODERMA CREALINE h2O, $29.95

Not new to the world, but new to Australia in 2013 (and only 89 times the price it is in France!) now finally available to buy. I’ve written on this gear before, and it is, quite simply, the finest makeup remover on the planet. Also, the most gentle, travel-friendly, sink-free cleanser a dame could possibly hope for. Maybelline is launching their version early 2014, which I will be very eager to try.

SMASHBOX CAMERA READY CC CREAM SPF 30, $54.95

If you’re not into CC creams yet, and I can understand the resistance, after the rapid influx of BB creams, I too figured they were a crock of shit, but they are so far from that. They are practically a gift from Makeupula, the makeup Goddess herself. They sit perfectly between tinted moisturiser and foundation, giving hydration, skincare benefits, sun protection, wonderful coverage and most crucially, excellent, dedicated colour correction for those of us who suffer from pigmentation (ME ME I HAVE THE MASK OF PREGNANCY ME ME ME )or redness, congestion or just uneven skin tone in general. The Smashbox CC finish is semi-matte but still real fresh, and I find I only need concealer on top and am done.

CLINIQUE MOISTURE SURGE CC CREAM SPF 30, $45

Yes, yes, a thousand times yes, I am a CC addict. This one is as wonderful as the Smashbox for essentially the same reasons, and both get a gruelling work out from me although I find this one gives a little more coverage, and is a little thicker. It’s just a case of whichever is closest to my greedy paw of a morning, really.

Clinique-CC-Cream-

PANTENE STYLING TREATMENT FOAM SMOOTH AND STRAIGHT $8.50

I always gravitate towards wet styling products (those that you apply on wet hair before styling, unlike dry ones which you use at the end, when hair is, uh, dry) that combine heat protection with their styling/setting benefits, and this is a great one for that. This foam (use only a small amount, it’s powerful and too much will lead to hair that needs washing a day before it should) protects the hair and conditions it, and makes it smooth and ready for a blow-dry. And even if you don’t blow dry, it behaves far better, and is straighter than if you didn’t use it. When I was away for a month, this and my volume powder and dry shampoo were all I packed.

YSL ROUGE VOLUPTE SHINE LIPSTICK $55

Peanut butter is the new chocolate, and sheer is the new matte. And this is the perfect example: creamy, gloriously sheer (but with definite colour, if that makes sense), absolutely non-cakey or drying, leaves a lovely flush/stain but is still glossy and is buildable for those who want more punch – this is one of those perfect examples of just how far lipsticks have come, and how many wonderful attributes they come with these days. I love #14 Coral in Touch, a coral-orange that will make your head spin for its summery perfection. Classy, vibrant, polished and fun.

NARS SATIN LIP PENCIL $39

Glides on like a balm, delivers extremely vibrant pigment and is a joy to re-apply, due to its elegant crayon stylings. Doesn’t last forever, but if you prime lips and use liner, you’re in good hands. Or, just wear it as a sheer wash, by pressing the product into your lips with your finger. I was particularly fond of the Palais Royale shade, a wine-coloured plum that works magnificently with bronzed cheeks and bare eyes.

nars-satin-lip-pencil-full-collection

ALL THE SPF 50 PRODUCTS AUSTRALIA FINALLY GOT

Remember, they’re not stronger than SPF 15 or 30 (or rather they are, but marginally, 2%, say), but what they do offer is more time protected. So, if you usually burn in 10 minutes with no protection, SPF 15 will give you 15x that in the sun protected, SPF 30 will give 30x that, and SPF 50 will give – you guessed it – 50x that. Terrific for the lazy at reapplying. (“All of us”.) Get on board.

Well, that’s me. What did you love/discover/use too much of this year?

And of course, happy new year, you gorgeous bastards. Thank you for all of your reading of blog. Here’s to an OUTSTANDING 2014 for all of us!

PS … I have MANY wonderful new things happening next year, and the second I am permitted, will yell at you lovingly about all of them. “How exciting!” as they say in America.

Responses to this drivel: 20 Comments
15
Dec

We spend an hour a week worrying about our hair looking shit.

Prowling round the web like a creep today, I found some “stats” on how we birds spend our time in reference to our appearance. They came to light via a survey in which it was revealed women spend an average of 628 hours a year fretting about how they look.

Frustratingly it gave no indication of how much time we spend reading stats resulting from surveys.

Here are some them, and how much time we spend on them weekly:

What to wear – 50 minutes

Whether outfit / clothes then look okay – 1 hour and 32 minutes

Whether my wobbly bits are covered up – 1 hour and 26 minutes

What underwear to wear under an outfit – 39 minutes

Being bloated – 1 hour and 1 minute

Having spots 56 minutes

Uneven skin tone 50 minutes

Tan / lack of a tan – 36 minutes

Frizzy / greasy hair – 57 minutes

Total time spent worrying each week: 12 hours and four minutes

You probably won’t relate or agree with all of these.

I, for example, wear the same fetching silver and purple Lycra one-piece every day which I know looks fantastic, so I certainly don’t spend an hour and half worrying about my outfit each day. But some, like the frizzy/greasy hair, yeah… I get that. I spend FAR too much time on my hair. Each day I wake up and some of the first thoughts in my head are: Is my hair clean? Do I need to wash or style it? If it IS clean and good to go, how much more time in bed looking at Instagram does this permit me?

If it was more obedient and didn’t insist on being attached to my scalp and therefore prone to oiliness, life would certainly be a lot more swift, appearance wise. I probably will never do it again (or WILL I?) but when I had permanent “Japanese” hair straightening ten years ago, and I had wash and go hair, and rain and swim and gym proof hair, life was incredibly sweet. (You can of course mimic this effect without all the growing-outness by having keratin smoothing, and I might actually get that again soon, although it does tend to mess with your colour…)

Anyway. I felt their weekly breakdown was lacking some things:

Eyebrow shape scrutinising –  30 minutes

Spot picking regret – 50 minutes

Blackhead inspecting – 41 minutes

Curiosity regarding overuse of dry shampoo with regards to grey tinge on scalp – 24 minutes

Admiring a freakishly perfect eye liner application – 42 minutes

Fretting over the correct order of beauty products – 34 minutes

Looking at chipped, dry nails and feeling bad about not having time to do them – 18 minutes

Removing eye poo – 9 minutes

Wondering if hairdo is passable as a ‘hairdo’ and not just a scruffy bun/knot thingy – 23 minutes

Taking a stream of selfies because everything looks kind of great, actually – 10 hours and 22 minutes

Have I’ve missed any? By all means, add yours below.


 freshbrows

Visual Aid:
The popular “car” or “taxi” selfie, taken in this case sans makeup (unusual for a selfie, unless posted by a supermodel in bed with moody filtering and a sexy piece of hair covering the face with the seemingly innocent caption ‘good morning’) to admire the fresh look a brand new brow shape and tint offers a dame.


Responses to this drivel: 25 Comments
06
Dec

Three powders that just make things better.

And they really do, and I know that because I bloody use them daily and I bloody love them.

POWDER ONE: Loose Powder

Which will: Set your makeup, remain invisible, not create or exacerbate your lines.

Face powders have copped a bad wrap in the past, mostly because they deserved it. It was horrible. Thick, salmon-toned and utterly unbelievable despite being the final product on a face, and the one meant to really ram home the “this is just great skin, obviously” effect.

While loose or translucent powders have always been different, far more lightweight and devoid of colour, they too had some work to do. For years I would shun them when having my makeup done for shoots or events because they made fine lines stand out and aged me, but now I not only sit quietly as they apply the powder right at the end (EVEN under my eyes) to set my makeup, I do it myself at home when I really want my makeup to stay in place. (In conjunction with primer used before my foundation.) Even if that makeup is only BB or CC cream.

I put this down to better technology, better and tinier particles, light-reflecting pigments and even the addition of skin care ingredients in some brands. Many loose powders now work to actively blur fine lines and soften the look of the skin, which is a complete contrast to what we have come to expect from them.

Do this: Take a clean, small blush brush (with no blush or bronzer on it at all) and dip it into your powder, tapping off the excess. Now lightly dust the brush down your T-zone (middle of the forehead, nose and chin) as well as anywhere else prone to shine. It’s also not a bad idea to set all of your undereye concealing and brightening work with a touch along there too.

I like: Laura Mercier’s Loose Setting Powder.

LauraMercierLoosePowder

POWDER TWO: Hair volume powder

This will: Add fullness, texture, grit and instant volume to even the cleanest or flattest or slipperiest of hair.

Also referred to as ‘hair powder’ or ‘texture powder’ (by hairdressers) or ‘magic dust’ (by me), this is very fine, wet dust that comes in a wee little container, generally around the size of a Milky Way, and takes your hair from flat, dull or too-clean and perfect and too shiny, to cool-girl film clip hair very, very swiftly indeed. It makes your hair look matte. Slept-in. But also fuller. Like you had an awesome blow dry and hot rollers yesterday, but then went out all night and slept on it. Perfect.

It’s a dry hair product, a finishing product, so you only use it once hair is completely dry if you’ve just washed it, or at any time if your hair is not just washed. It is horrible when used on wet or even damp hair. Don’t do it.

Do this: I have provided instructions on how to use it many times, but basically, you want to very lightly sprinkle/tap the product onto the scalp, all over the head. Quickly and randomly. I lift up sections and tap on the underneath so as to get the volume and texture without the visible  heaviness on the scalp, which can happen if you use a lot, because it’s a no-turning-back product, and by that I mean, if you go overboard, you’re screwed. So start lightly. Even by tapping it out onto fingers and then massaging those fingers into the scalp.

On photoshoots I note the stylists will often use the powder on my mid-lengths to ends as well, for that piecey, rock girl, matte, dishevelled look, which I sometimes do, but find it weighs my fine hair down just a touch, so only when my hair is SUPER CLEAN and super boofy and the only way to remedy it is with a shittonne of texture and the kind of facial expression that assumes I meant it.

 I use: Pretty much all of them. Don’t style hair or travel without them. Am a long time fan of the original, Aveda’s Pure Abundance Hair Potion, but currently using Redken’s.

Redken-03-Powder-Grip-Mattifying-Hair-Powder

 POWDER THREE:  Dry shampoo.

This will: Save your arse when your hair is dirty and uninspiring. Also: add volume and interest when your hair is clean.

I really probably can’t write too much about this Desert Island, can’t-live-without, Top Five, Must-have, go-to product, since I have done so so extensively in the past, (and even created a how-to video on it, which seems ridiculous but many dry shampoo users are simply not using enough product, or using the product close enough to the scalp, or massaging it in fully) but suffice to say, I’m an enormous fan and generally have around four cans on the go at once. I use it to liven and puff up greasy hair, but also love it on clean hair to make it a little more matte (not gritty and textured, as per hair powder) and add some gentle second-day-ness to it.

(And yes, it is a powder. A really, really fine one. Like talc.)

Do this: Spray no more than 10cm away from the scalp. Use a fair whack of product. (Go for the Batiste coloured versions if you hate the grey-wig hair look this creates because of your darker hair.) Allow the product to sit on the scalp for 15 seconds. Massage in with hands if you’re short of time, or blow dry through with a brush for the perfect crime (i.e.: undetectable). Blondies tend to get even more use out of dry shampoo, because of their bleach, and can use it for 2-3 days in a row before succumbing to a wet shampoo (how old school) but us darker haired and fine hair babes can usually only get one day of dry shampoo on hair that’s worn out, and one day when it is up. (The REALLY PUSHING IT dirty hair final frontier.) Also, keep in mind you will look like you have dandruff if you use dry shampoo too many days in a row, cos that shit builds up. Definitely shampoo twice when you finally succumb to a hair wash.

I use: All of them, but am especially partial to the Batiste brunette one.

Batiste Brunette


Responses to this drivel: 14 Comments
27
Nov

Everything you need to know about pregnancy beauty.

… will probably not be found in this post.

That’s because I DON’T KNOW ANY OF IT YET. I’m sorry! God, stop looking at me like that. New to this. Still finding my feet (among all the Twisties wrappers.)

Look, pregnancy is something that I, like many of us, spent most of my life actively trying to avoid; my information on it relegated to how it happens (“sex”) and how it ends (“a baby”).

But now that I have been lucky enough to have scored my sweet little uterus tenant, I am suddenly and acutely aware of just how much I do not know about this strange, mythical new world. I imagine it’s much the same for those who have recently taken up neuroscience, competitive wind sailing or Minecraft. That’s not to say I am not learning. I have my books, I have my body pillow on order, and I am missing sashimi more than you will ever really understand, to be honest. But the beauty stuff? The stuff that I am good at in Real Life, (similar to Pregnant Life, but with smaller bras and more wine), it hasn’t just immediately manifested.

I’ve picked up a few things, of course. I ask a lot of questions, especially when getting beauty treatments and when in the company of mums who have a vested interest in that stuff, and some of it is obvious. But a lot of it is NOT obvious. Like spray tans, for instance. Are we allowed to get them or not? I had an organic one and wore a face mask, just to be sure/paranoid. (The answer is below, for the record.)

I can’t help thinking there are a lot of unnecessary precautions in the world of pregnancy beauty, and that common sense, as always, should prevail. But that doesn’t mean I’m not going to ask you all to throw up your beauty beauty tricks and tidbits in comments below, so that we can all learn, together, at once, united in lower back pain and nausea. (Just on nausea, which I was slammed with all-day for the past three months but am finally seeing the end of, I think sugar definitely makes it worse. Ditto too long between meals/snacks. Also my hunch is that pregnancy can definitely exacerbate it.)

Here’s what I’ve gleaned so far:

HYPERPIGMENTATION

I wrote a huge post on this recently, which I urge you to read if you haven’t already. Hyperpigmentation can become a real bitch during pregnancy, due to hormonal changes and an increased sensitivity to UV. Your best chance is to use a pregnancy-safe pigment inhibitor, followed by a physical or mineral sunscreen, (zinc or titanium dioxide based) each and every day. Also, a wide brim hat, and sunglasses. IT’S WORTH IT. It’s only going to be harder to shift once your hormones return to normal, so you may as well try to keep a lid on it now. Tight lid. Screw top. Vacuum sealed. Sticky tape on the sides.

At home I use: Aspect Pigment Punch OR Aspect Vitamin C serum (less active than Pigment Punch), followed by O Cosmedics Mineral Pro during the day, and the serum plus a lovely thick face cream at night. (I have heard from another pregnant beauty ed that Aspect’s Exfol L is great, too.)


O Cosmedics Mineral Pro Tinted

In salon: I am keeping up with my occasional lactic peels. (I go here, Brooke is unreal.) AHAs are fine through pregnancy, but lactic is the best bet, being the most gentle. My skin is glowing, which is terrific for people thinking you have the “pregnancy glow” when really you’re sleeping terribly and engaging in a diet more suitable to a stoned teenager. Just be mindful, if you do go for a peel, that your skin may be more sensitive due to hormones, and it may actually make the pigmentation flare up, (and return swiftly) so do small patch tests and low solutions to begin, and have a full “I’m with child!” consultation with the therapist.

The standard avoid list…

– Things with irritants and toxins. Skin can be more sensitive when you’re preggo, so go easy on it.

– Products with more than 2% salicylic acid (found in a lot of acne treatments), also known as BHA. Small amounts, such as in a cleanser once a day, or a spot treatment are fine. If in doubt, switch to AHAs, which will have a similar effect but are deemed totally safe.

– Vitamin A, Retinol, retinoids, retin-A, retinoic acid, Retinol Palmitate, Retinyl Palmitate etc.

Soy products, which can aggravate your pigmentation.

– Oil of Bergamot, for the same reason.

STRETCH MARK PREVENTION

Every woman has her swear-by-it stretch mark preventer, but I really swear by mine. I do! I stand next to it and yell obscenities each morning. Hilarity aside, as long as you are using something on your stomach, hips, thighs, back and bum, you will help a lot. That’s not to say all products are created equal… Share your pick below, obviously, and stop hogging all the non stretch marks.

Before we do that though, the best piece of advice I’ve received is to keep up with the lotions/oils/butters post birth as well. Don’t drop the ball just cos you dropped a baby.

I use: Gernetic Synchro, (I got my facialist Natasha – who, wait for it – swears by it) to snaffle me the bucket/salon size as it is generally used as a face cream… which I use it for, as well) and a special belly butter made for me by my dear friend at Sodashi, Megan Larsen. HOW LUCKY I AM. I also use (this might be the most frustrating list of products in history) a dreamy body oil that is not yet on the market but will be early 2014 and will blow any socks off you happen to be wearing. Ideally you would alternate between oils and creams, because the skin is made of and needs both moisture AND sebum/oil.

Gernetic Synchro

Others use: Check comments below for evangelical ideas from women who have actually HAD a baby, but I know that The Body Shop and Palmer’s body and shea butters rate well, as does Weleda’s stretch mark oil.

SPRAY TANNING

DHA, the ingredient that marks your skin in spray tans is considered safe, however, you should cover your schnoz and mouth while you have your spray tan to prevent inhalation, so check your salon has face masks available. Also, maybe wait til you’re in your second trimester to salon spray.

BOTOX

Not approved or recommended. The definitive jury is out on its effects on the baby, due to not enough research, but why on earth, wind or fire would you risk it. Also deemed unsafe while trying to conceive, breastfeeding and flying planes.

LASER SKIN TREATMENTS

Not advised. Nor are depilatory creams, due to heightened chance of allergy. Guess it’s back to waxing, ay bro.

TEETH

One of the joys of pregnancy is being allowed to leave early when dinner parties are dull. Another is gingivitis, AKA inflamed, sore, bleeding gums and manky breath. Cute. I saw my dentist last week and it was a godamn blood bath. Horrible. Definitely see your dentist at least once during up duffery, and absolutely brush, tongue clean, floss and mouthwash daily. (Cause we all have two hours to get ready, yah?) Important though. Bad breath is about as alluring as month-old sushi.

I use: My Philips Sonic Airfloss (read my review here, it is AWESOME and excellent for floss-haters), toothbrush, Listerine Zero (no alcohol, means no drying out of the mouth) and a shitty tongue scraper I bought from the chemist.

philips-sonicare-airfloss

HAIR

There are lots of (around 798,982 at last count) conflicting reports regarding what you can and can’t do with your hair when pregnant, but generally the guidelines are to wait until you’re in your second trimester (you know, the one when you can stomach more than white toast and walk up stairs without gasping for breath), opt for highlights rather than tints, so as to avoid scalp contact (things like balayage are great, because the highlights begin at the mid-lengths) and go for semi-permanent colours rather than permanent to avoid ammonia. I had my hair coloured recently and sacrificed exactly nothing in terms of its appearance by using these techniques.

Okay. Time to pop an Elevit/a hairband around the button on my jeans.

What are your pregnancy beauty tips and favourite products? For the love of leg veins, tell us.

Responses to this drivel: 51 Comments
21
Nov

Flattering nail shapes: something to consider.

I know what you’re thinking, “But I love Pizza Shapes so much, why would I switch to Flattering Nail flavour??”

Ha ha ha, I’m joking, obviously. We all know BBQ is the best flavour.

But seriously, flattering nail shapes, let’s get serious about them, for serious. Because depending on the way you shape and file your nails, your fingers can look long and elegant, or they can appear stubby and short and less lovely than you or I can probably handle. Of course, it’s entirely down to personal preference, some just really love the look of long, square nails, or short natural nails, or long terrifying talons, in the case of Rihanna.

But most experts agree that the most flattering nail shape for your finger will be one that closely mirrors the white (usually crescent shape) line at the bottom of on your nail bed, called the Lunula. If the Lunula  is curved, you’d probably best suit an oval or rounded shape. If it’s more flat across, try a clean squared shape, or even squoval (square strong sides, with rounded corners). Have a look now, go on. I can wait.


Oval_Lunula

Oval Lunula


Straight_Lunula
Flat or square Lunula

Mine? Slightly oval. Not fully oval, as in the image above, but definitely not square, or round.

Because of this, I’ve stopped asking for short, square nails, even when I opt for very dark varnish colours. Keeping them a touch longer, (not too long, just long enough to be able to create a subtle oval shape) looks a far more alluring on my fingers, seemingly elongating the fingers, and making me look like more of a Grown Up Lady than I deserve to.The  stubby, stocky look that used to result when I kept them short and square, is no more.

Keen listeners  to this station will point out that for years I have said: “If you wear dark nail varnish, be sure to keep your nails neat and short.” And now I seem to be going against my own advice.

It happens sometimes, generally when I learn a newer, better way of doing things.

But as you can see from my current nail situation (OPI Mamma Mia), with a longer, oval-esque nail shape, this is not about long, scratchy talons. It’s just about a bit more shape, and a whisper more length. KILOMETRES more flattering than short and square on my hands.

Photo on 19-11-13 at 2.43 PM

As a basic guide, here are the common nail shapes we tend to go for.

Maybe try a new one next time you have your nails done, or keep a bit more length, or remove some length, or just, I don’t know, stick postage stamps on them for something different.

Nailshapes


Responses to this drivel: 17 Comments
13
Nov

How to do short hair in 2013.

In short? (Zzzzing!)

The rule seems to be go real short. Pixie short, if you can handle it.

Cases in pointses:

Ms Pamela Anderson, who may have lost her length, but has gained several metric tonne of elegance as a consolation. So Frenchy! So Chic!

Ms Jennifer Lawrence, whose hair was so ravaged from swinging between blonde and brunette, that the only option was to cut it all off/piss off everyone in the continuity unit at Hunger Games Inc.

Ms Charlize Theron, who is a master of very short hair, and who shaved it all off for a movie role with grace and pistol fingers.

Of course, not everyone has the need or desire to go quite so short. They tend to opt for the bob instead, this lot. Which is a terrific middle-ground for those looking for a dramatic change, without all the shock factor and hair gel required for a pixie cut.

Ms Jennifer Aniston is the most recent and famous example. She revealed the cut was NOT to make putting her motorbike helmet on and off easier as I initially suspected, but rather because Brazilian smoothing treatments had, well, fucked it up, to be blunt. Good lesson here for those addicted to the keratin smoothing treatments: MAKE VERY SURE the one you use is absolutely devoid of formaldehyde and its variants.

The Grand Priestess of Bobs, though, is of course Daryl Somers. No, sorry, I mean Karlie Kloss. She cut her long, runway-friendly hair off to just below her ears and thousands of us immediately imitated. The best part of The Kloss is watching all the way she styles it: straight, tucked behind one ear, wavy and textured, curly and cute…. Some say bobs are dull and impossible to make look sexy and the opposite of versatile. Karlie spits on this suggestion. (Sexily, in a model way.)

I go short every couple of years, when I tire of long hair and top-knots. I feel more ‘me’ with short hair, more stylish perhaps? More something. But when I have longer hair as I do now, I remember how easy it is to just jam it back, or because of the weight and length, let the curls sit semi-naturally and just be themselves and hang out and stuff. I have been pixie short only once, back in about 2006, and because of my curls and cowlicks, I had Japanese permanent straightening first, so that it was smooth and obedient. It was pretty fun, actually. I will probably do it again one day, but will resist the permanent straightening and just do the non-Aniston semi-permanent smoothing instead. (The place I had my handsome new colour done the other week, Xiang, they do it.)

Products that are excellent for short hair:

A texture spray: Something like Bumble & bumble thickening spray used on wet or dry hair is excellent for volume and mussiness. I especially like it on dry hair, roughly blasted through with a hair dryer on high heat.

A smoothing product for waves/curls: Use on wet hair and then blow-dry through until the hair is smooth. Follow with a soft tong job all over. Pantene’s Styling Treatment Mist Soft Curls is perfect.

A wet-style gel for slicked back looks: Short hair is the best length for  sexy, masculine slicked down/back looks and it makes me a touch jealous, in all honesty. On dry, smooth, blow-dried hair, apply a mix of wet-look gel or balm – like Redken’s Hardwear 16 super strong gel- with some water and comb through with a fine-tooth comb. Tuck behind ears, or do a deep side part.

If you have been flirting with the idea of cutting off your hair, now is a great time to take the jump. This is because it’s National Donate Your Hair Week this week, which is part of the Pantene Beautiful Lengths program I am ambassador for, which asks women/men/children to snip off their hair to donate and make real hair wigs for women undergoing cancer treatment. It’s SUCH a fantastic bloody initiative, I love being part of it, and while we’re stoked we raised over 5000 ponytails in our inaugural year, we’re obviously greedy and want to double that this year.

To check if your hair is eligible for donation, head to the Beautiful Lengths website, and don’t worry if it’s not long enough to cut off this week, the campaign goes all year, and we happily accept donations at any time. (Where and how to send your ponytail is also on that website.)

Oh, and if anyone knows this woman, please tell her to get in touch with me.


Responses to this drivel: 13 Comments
05
Nov

Hair colouring: Are you a contraster or a blender?

Don’t worry, I didn’t know what these terms meant until last week either.

Blender

Your eye colour is on a similar colour level to your base hair colour. (What your roots are/what your natural colour is.) Creating a blend of similar toned colours is most flattering for you. If you go too stark in contrast, you’re not doing your hair OR your eyes (or skin tone) and favours. Take Jennifer Lopez for example. She is all warm chocolate eyes and so when she blends in chocolate and caramel and toffee tones together in her hair, it is perfection on her. If she were to go bright, cool blonde or dark ashy brown: no good.

Famous Blenders include:


Contraster.

Your eye colour is on quite a different level to your base hair colour, and the best way to accentuate this interest and excitement is with a contrasting hair colour, at least around eye level. If you go for hair colour that is too similar to your eye shade, you can look washed out, or, uh, boring. (THE WORST THING EVER.) This is where people like Kristen Stewart are perched, with piercing light green eyes bought to life with dark, contrasting brunette hair. If she went soft light blonde, it would be too similar a level to her eyes, and do nothing for her.

Famous Contrasters include:

Have a good think about whether you might be a contraster or a blender, as chances are it will provide some impressive clues as to why your hair colour is or isn’t working for you, or if perhaps there is something new you should try. It can be a bit tricky, I should admit. Some people can be both a Blender and a Contraster. And there are nuances within eye colours, for example, like the difference between dark blue eyes and light blue eyes. A dark blue eye (think Drew from Big Brother for those of us danguses who watched it) will look fantastic with a darker brown hair base, (Contraster) while a light blue eye colour (think Cameron Diaz) is much more of a Blender, and is suited to a lighter, blonde base.

I learned all of this as I had my hair colour done last week at Xiang salon in QV, Melbourne. This was my first (finally!) Melbourne colour and cut, but I was several post codes from nervous as my colourist was Dani Solier, who owns the salon with her boyfriend Jamie Furlan (who cut my hair perfectly: all one length to thicken up my super fine hair). Dani heads up the L’Oreal Professional Colour Team so she knows things. She is a top bird and the clever dame who did my hair at the Logies last year. Five stars.

Anyway. I explained to Dani I was enjoying my underlighting, but was feeling like I might like a slightly darker brunette shade around the face. Keep seeing Megan Gale look all amazing with her dark hair and getting jealous. And, was feeling like since the last colour had faded (my laziness being the reason) it was all a bit… meh. Dani gently agreed, and explained that because I am naturally a Contraster (light eyes, dark base colour), when my colour is too similar to my eyes and there is no contrast, I looked washed out.

And godammit, she was right.

Dani decided to use the new range of L’Oréal Professionnel INOA shades (of which Alexa Chung is ambassador… which gives you some idea of what L’Oreal’s motive is… natural, cool-girl hair) to create DEFINITELY NOT OMBRE HAIR despite the product name, (because I explained to Dani that I was very uninterested in two-tone or dip dye hair) but lovely, very-subtle natural reflects and colour graduation around the mid-lengths and ends for excitement and texture. I looked at the images from the campaign to see what I was waltzing into and was pleasantly impressed. This isn’t balayage circa 2010. This is all new shit.


The result: A gorgeous dark, cool, ashy (all VERY important words to use with your colourist if your natural hair is cool-toned and you wish to avoid redness or gold in any way shape or form) ammonia-free gloss up top, then lived-in, subtle highlights seamlessly blended in below. It’s not hugely different to my previous underlighting, but there is definitely way more contrast, and THAT is what I like.

I’m a BIG fan because it does nice things for making my eyes stand out, but still offers lots of (much-needed) texture because of the ribbons of lighter hair below.

I promised Dani that I would not be a naughty shit and let the highlights get all blergh and the gloss get all dull by neglecting to use specialised colour protect shampoo and conditioner, and of course, I would always protect my hair before heat-styling.

She seemed satisfied with that.

Are you a Blender?

Contraster?

No idea?


Responses to this drivel: 35 Comments
28
Oct

Liquid illuminator: Should thoust be using one? How? Which one?

That depends.

If you were to have asked me back when I was a gung-ho little squid in my twenties with nay a face crease to be seen, I would have bellowed YES and then roughly thrust several (Benefit High Beam etc) in your face and told you what a moron you were not to use them everyday for all-over glow and delight.

NB: I am referring not to concealing illuminators, such as YSL’s Touche Eclat, but rather the tinted, gleaming skin luminising variety that are used all over the face, or for spot highlighting on cheekbones etc.

But now, as a more mature llama in her early thirties I am a little more reserved on both my use and endorsement  thereof. For while liquid illuminators and highlighters are indeed a delicious way to achieve a flawless dew and gleam to the skin, they are not for everyone.

WHAT ‘NOT FOR EVERYONE’ MEANS:

– Those with large pores, fine lines/wrinkles, scarring or blemishes. This is because just like anything with shimmer, no matter how finely milled, it will exacerbate these things. (This is why you need to get your mum/granny off shimmery eye shadows, by the way.)

– Those with oily or sheeny skin: you should stick to cream or powder illuminators instead.

– Those with a lot of hyperpigmentation will need to fully conceal this before applying illuminator, as illuminators will (some say unfairly) highlight the uneven skin tone.

– Those who cannot be trusted to be light-handed. This is not body glitter, and this is not 1998.

– Those who have a habit of not blending thoroughly, or taking the time to check their makeup in a truth mirror before leaving the house.

However. When used correctly, skin illuminators can be a marvellous thing. Just ask one Cate Blanchett who is rather fond of them, and who has no qualms whatsoever using them on her (admittedly flawlessly smooth and event-toned) skin, and fierce cheekbones in particular.

They can make the skin appear to be well-rested and full of gorgeous, arrogant health, and glow in a way that is usually reserved for several high-strength peels, or taking a new lover. They create fantastic effects in photos, even if you choose to then filter the shit out of them for Instagram.

THE BEST WAY TO USE YOUR LIQUID ILLUMINATOR:

1. Added to moisturiser or primer for a subtle and believable ‘skin-level’ radiance. Be sure you choose the right tone for your skin, so that it looks like your skin, not something you have put on your skin. Alternatively, choose more of a ‘moisturiser’ style illuminator for this purpose, like MAC Strobe Cream. Just on primers, they are a terrific idea when using liquid illuminators, which have a habit of racking off after a few hours. Also a light dusting of loose powder to finish is not the worst thing you could do. Especially if you feel a bit too … gleamy.

2. Apply one part illuminator with two parts foundation for all over glow. I recommend this as a night time look only, just in case you look a bit too sparkly during the brutal light of day. Having said that, Armani Fluid Sheer is not too shimmery for day, as is hailed as the king for this.

3. Bronze illuminators are a wonderful way to get your face up to the tan level of your self-tanned body, and achieve a soft tanned glow. Apply gently all over the face underneath your foundation. (After primer if you’re using it.) You can also use these buffed gently onto areas you would normally use bronzer after having done your makeup, but be sure to only use over liquid foundation (always keep textures with like textures), be very light handed and if possible, use a cheek stippling brush (like the wonderful MAC 188 brush below) which buffs liquids and creams into the skin perfectly.

MAC188Brush

4. Use on top of blush. Adding some pinky luminiser on top of creme blush gives the best – and most long-lasting – result. Illuminators by themselves are usually not pigmented enough to act as blush. And nor should they be – their job is to throw light, not colour. This is me with Revlon Photoready Skinlights in Bare Light gently dabbed over my cheekbones, on top of some creme blush. Lovely subtle glow innit.

LuminiserZo


5. As a finishing product, illuminators beautifully highlight and skim the top of cheekbones and brow bones. Be sure to warm up the product thoroughly in your hand before applying, and it’s best to use a foundation brush for precision, although fingers will be fine, too. If in doubt, apply in a boomerang shape, starting under the highest point of your eyebrow and dabbing down around underneath the eye along the top of the cheekbones. Also on the top of the cupid’s bow. Adorable.

6. As a guitar pick.

LIQUID ILLUMINATORS I AM RATHER FOND OF.

Revlon Photoready Skinlights – They took them away from us years back, but thankfully the original skin illuminator is back. There are only three shades this time around (bronze light, bare light and pink light), but I find the bare light the perfect shade for my warm skin tone, (go for pink light, fair-skinned babes) and I happily dab it onto the high points of my face as a finishing product. It’s probably a bit to shimmery for me to blend with my foundation day to day, but if I’ve just had a facial, or am having a great skin day, or am heading out for an event, then I might add a drop (A DROP) into my foundation.

3RevlonPhotoreadySkinlights

Tom Ford Skin Illuminator Fire Lust – a luxurious, sheer peachy-gold that is perfect for applying over creme blush, (I am not messing around when I say sheer, there is little point using this alone as a finishing product) or, if your skin tone is warm enough, added to your foundation for an all over gleam without any glitteryness or overt pearlescence, Just lovely good-skin-ness.God, Tom Ford is good. Someone let me know if he ever gets it wrong, won’t you? Annoying NB: This is out now but limited edition.

TomFordFireLustilluminator

Becca Shimmering Skin Perfector – Wonderful as a skin-perfecting (hence the name) base underneath your foundation, and the perfect amount of glow but NOT shimmer to mix in with your foundation for a genuine your-skin-but-better look. Great too as a targeted highlighter, and I deeply enjoy using the tanned shade, Topaz, as a liquid bronzer on fun summery nights, and mixed with moistirser on my décolletage, or “booby area.”

BeccaShimmeringSkinPerector

Armani Fluid Sheer – The high priestess of liquid illuminators, this lush, makeup artist favourite does everything a grown up liquid luminiser should, from being used on its own or mixed with moisturiser for glow-from-within lightbulb skin, to the finishing touch on a perfectly dewy complexion. Shade #11 -a rosy, flushed hue – is extremely enchanting for cheeks and on pinker skin tones, while I love #10 for a more golden radiance.

 Armani_FLUID-SHEER_10


Responses to this drivel: 18 Comments